Wi-Fi 6 devices are able to distinguish between frames that belong to their (associated) Basic Service Set (BSS) and Overlapping Basic Service Set (OBSS) by looking at the “color” of a frame. The term “color” is a bit misleading as it is rather a numeric number from 1 to 63, but the idea of a color is much nicer and easier to grasp. However, a mapping of number to specific colors is not defined within 802.11ax, so each vendor and each tool can map a number to different colors.
Color Announcement
An Access Point (AP) announces the color of its BSS in Beacons (see Figure 1 below), Probe and (Re-)Association Responses. It is part of the HE Operation Extension Tag and also includes a Partial BSS Color (not part of this post) and a BSS Color Disabled field (explained later). The BSS Color is then used in every 802.11ax Data Frame transmission.
Note: As the color is bound to the radio interface of an AP, the radio(!) uses the same color for all of its SSIDs.
Figure 1: BSS Color in Beacon
Usage of BSS Color
On the one hand, the BSS Color is an easy way to differentiate between multiple radios without looking at MAC addresses or (B)SSIDs. You can also use a color as a filter within wireshark, although this will only give you the data frames for the specific BSS, no management or control frames!
On the other hand, the BSS Color enables a Wi-Fi radio to determine quickly if an incoming frame is send from a device within the same BSS or not. Until 11ax/Wi-Fi6, a radio needed to decode a frame header until the 802.11 MAC header begins. The MAC header includes the MAC of the transmitter, receiver (can also be a Multicast or Broadcast MAC) and the BSSID. With these information, the radio can determine, if the frame is of any interest and further decode it. Otherwise, it might stop decoding it any further and go back to an idle/sleep mode, e.g. to save power (nonetheless, the radio has to update the NAV).
Figure 2: 802.11ax Frame with BSS Color
Within the 802.11ax (a.k.a. High Efficiency (HE)) Preamble, the HE-SIG-A field (see Figure 2 above) contains the BSS Color of the BSS that sent the frame. As the preamble is placed before the 802.11 MAC header, the radio is able to determine the origin of the frame while decoding its preamble, which allows the radio to go back to idle/sleep quicker in case its not color of the associated BSS.
Uniqueness of Color
The BSS Colors can be either user defined or generated by the chipset driver. In both cases, a scan of already used colors is beneficial, but not required. As soon as a radio, either AP or client, notices a “color collision”, the BSS color has to be changed. A client can therefore send a BSS Color collision report to its associated AP including all the colors that the client is able to detect to help the AP to choose a new, unique color.
An AP is forced to inform about a color change by disabling the BSS Color in use while simultaneously announcing a BSS Color change. Such a color change is send within the Management Frames like Beacons, Probe and (Re-)Association Responses as an Element ID Extension (see Figure 3 below) that includes a countdown as well as the new color. The countdown indicates the number of Beacons left until the color change will occur (comparable to the Channel Switch Announcement). As soon as the countdown reaches “0”, the new color is used and the BSS Color disabled field will be set to “0” (False) again. After that, the BSS Color Change Announcement is removed from the Management Frames.
Figure 3: BSS Color Switch Announcement
Real World Impact
As shown above, the BSS Color is a nice feature without having any huge impact on the Wi-Fi world as it is today. The amount of power saving due to less decoding of a frame might be rather minimal. However, you might have heard that BSS Color also improves performance in congested areas. This statement is only true, if BSS color is combined with another feature called Spatial Reuse Operation (SRO).
Some sort of SRO has already been introduced by Cisco as Rx-SOP (Receiving Start of Packet) as a proprietary feature and has found its way into many other AP vendor implementations. Downsides of Rx-SOP are, that it only applies to APs and it also causes a link imbalance between AP and clients. As it enables only the AP to increase its throughput by ignoring any frames below a certain preamble/signal detect threshold, giving the AP more “free” airtime for sending frames. Clients do not have that feature and are therefore not able to increase their throughput in the same way.
Furthermore, the clients get no hint that the AP is throwing away frames below a certain threshold. This creates the imbalance and can cause trouble for associated clients sending frames that are received at the AP with a signal strength below the AP’s Rx-SOP threshold and are therefore discarded.
That’s where Spatial Re-Use Operation will come into play. As it is standardized within 802.11ax, AP and client vendors can implement it. Furthermore, it can leverage BSS Color to differentiate between frames that are part of the BSS, which should never be discarded and frames from OBSS, which can be discarded. As Spatial Reuse Operation is a topic on its own, it will not be covered here.
Conclusion
As mentioned in the real world impact section, BSS Color alone is a nice feature for Wi-Fi 6 and future Wi-Fi generations to determine if a data frame is of any interest much quicker than before. Legacy devices are unable to leverage this color information and the impact on the real world will be rather small as long as BSS Color is not combined with Spatial Reuse Operation.
Besides “Wi-Fi Protected Access” version 3 (WPA3) there has also been an update to open networks by the Wi-Fi Alliance in 2018 [1]. The term open networks refers to networks/SSIDs that do not require a credential (e.g. password) for a connection. This convenience is preserved with Enhanced Open.
However, open previously meant that there is no authentication and no encryption, whereby the latter will be changed by Enhanced Open. As data is then encrypted, it is impossible to read any transferred data on such a network by just sniffing the air. It can be compared to HTTPS, where no (user) credentials are required to securely connect to a website.
Please note: From a Wi-Fi Alliance point of view, Enhanced Open is not part of WPA3 and there is no such thing as WPA3-Open. Enhanced Open is a separate feature in the security program focused solely on open networks.
Now, let’s dig into the details of Enhanced Open to see the benefits and shortfalls.
Changes to Open
Open Connection Establishment
Before the details of Enhanced Open are explained, we should take a look at the current connection establishment of an open network. The following graph shows only three types of frames, which are all unencrypted: Authentication, Association and Data. In contrast to a connection establishment for WPA2 or WPA3, no EAP 4-way-handshake is used as no key is required and ergo no encryption of data frames is possible. So after the “Association Response” frame from the AP to the client, data frames are exchanged without any encryption.
Open Connection Flow Chart
Cryptographic Consistency
Enhanced Open requires the AES CCMP-128 [2] encryption method, with an 128 bit key, and does not allow any old and broken methods like TKIP or even WEP. CCMP-128 is the default encryption method of WPA2 and WPA3, so nothing new or fancy is added for this new encryption method.
Protected Management Frames (PMF)
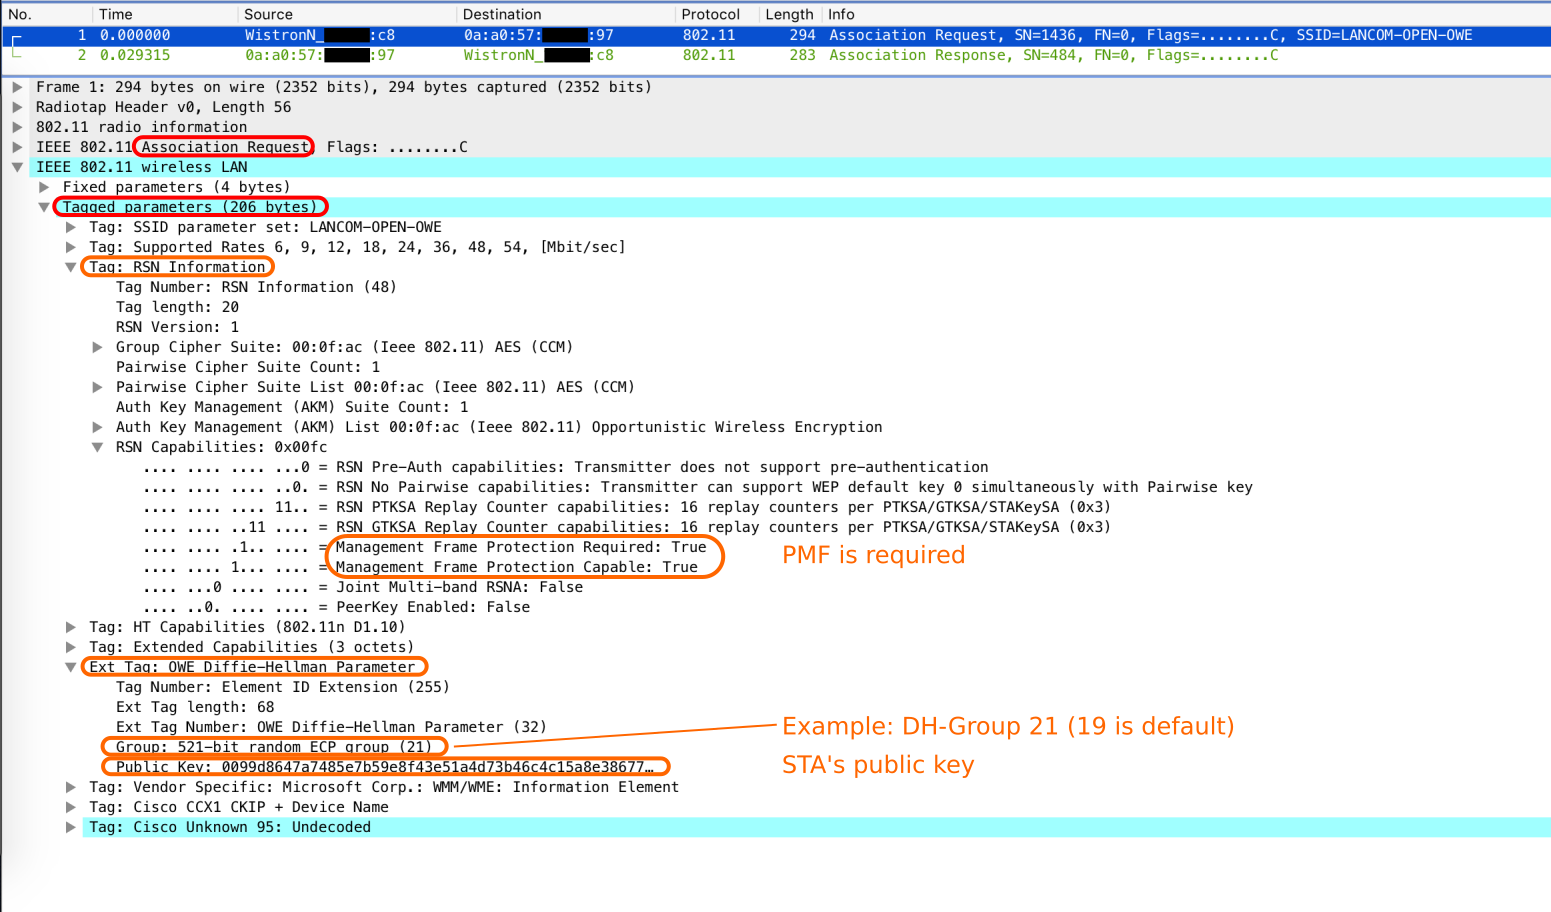
All Enhanced Open devices need to use PMF, so it is activated implicitly as soon as the user connects to an Enhanced Open SSID. PMF delivers a protection against forging management frames, e.g. an attacker can disassociate any user by claiming to be the Access Point (AP) that the client is currently connected to. Although it has been around for a longer time, even as a requirement for WFA 802.11ac (VHT) certification, the market adoption was rather low. A more detailed look into this topic is given by my previous blog post on Protected Management Frames (802.11w). Enhanced Open uses the “Management Frame Protection Required” mode with SHA-256 [3] for Hashes.
Opportunistic Wireless Encryption
Enhanced Open uses the Opportunistic Wireless Encryption (OWE) methodology that is defined by RFC 8110 [4] written by Dan Harkins and Warren Kumari. The following figure is a Beacon for an OWE SSID. Although this is an open network, an RSN element (!) is present with. It includes OWE as Auth Key Management index 18 and, as already mentioned above, AES CCMP-128 as group and pairwise cipher suite.
Please note, that legacy open networks do not include such an RSN element as no encryption keys are negotiated.
Enhanced Open Beacon
OWE, just like WPA3-Personal, offers a much better method of establishing a secure connection over an unsecure medium – the Diffie-Hellman (DH) key exchange [5] in combination with a Prime Modulus Group or an Elliptic Curve Group. Since the latter is made mandatory for OWE, the following explanations refer to it.
There already exist some predefined curves as Diffie-Hellman groups 19, 20 and 21 (group order r) with given prime numbers p of certain (bit-)lengths. For example DH-19 refers to the 256-bit elliptic curve defined as NIST p-256 [6] with the prime number p = 2^(256) – 2^(224) + 2(192) + 2(96) – 1 = 1,157920892×10⁷⁷ and the elliptic curve equation: y2 = x3 – 3x + b, where b is given by a certain 384 bit number.
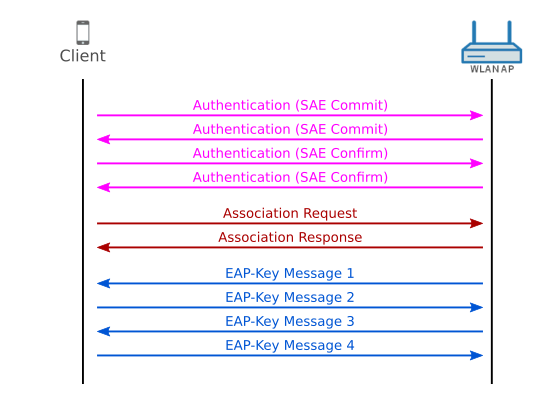
Enhanced Open Connection Establishment
As encryption requires keys, the main difference to the open connection establishment is the added EAP key handshake to derive a transmission key for data encryption. Furthermore, the Association Frames now include public keys, one from the client and one from the AP. After the EAP key message no. 4, encrypted data frames are exchanged between an AP and a client.
As indicated in the figure above, the Association Request and Response contain additional information – the public key material of client and AP. See the following figures for the details of the Association frames. Before the Association takes place, both sides choose a random number (its private key from now on) and multiply it by the Generator G of the chosen DH-Group to retrieve the public key.
Enhanced Open Association RequestEnhanced Open Association Response
Notice: How do AP and client choose a DH-Group when none of the frames previous to association phase contain any details about that? Well, they don’t agree on or choose a DH-Group , it’s more like trial and error. The client tries one (DH-19 is the default group) in his Association Request and if the AP accepts this, it answers with his public key and the same group number in the Association Response. If the AP requires a different group than the one offered by the client, it has to deny the association with a failure code of 77 / 0x4d (Wireshark: “Authentication is rejected because the offered finite cyclic group is not supported”) and the client has to try again with a different group.
Association Response with an unsupported DH-Group status code
Establishing a Pairwise Master Key in OWE with ECC
The following paragraphs require knowledge about hash functions, scalars, points/vectors and operations on them. Please jump to the next section, called “Security Considerations”, in case you are not interested in this detailed explanation.
After the Association, a Pairwise Master Key (PMK) is created on both sides by using elliptic curve (or optional finite field) cryptography. As DH-Group 19 refers to an elliptic curve, we will continue with elliptic curve cryptography.
The private key Priv is a scalar and the public key Pub, created by Priv multiplied by Generator G, is a point on the given elliptic curve of the DH-Group. At first, the function DH() multiplies the scalar Priv with the elliptic curve point Pub of the other party and retrieves a new point on the curve called new_point. This new_point is then fed into the function F() to retrieve a new_scalar. All public keys, the number of the used DH-Group as octet in little-endian format (e.g. DH-Group 19 is 0x13), and the new_scalar are handed to the HMAC-based Key Derivation Extract Function (HKDF-extract) to create a pseudorandom key prk. The Pairwise Master Key is finally calculated via HMAC-based Key Derivation Expansion Function (HKDF-expand) based on the prk, the string “OWE Key Generation” and the desired bit length n of PMK (as defined by the Hash algorithm to be used according to the chosen DH-Group: 256 (19), 384 (20) or 512 (21) bits).
Notice: The HMAC-based Key Derivation Functions are defined in RFC 5869 [7] and not further discussed in this post.
Furthermore, a PMKID is created by hashing the public keys and extracting the leftmost 128 bit of the result. The hash function to be used depends on the size of the prime defining curve p.
PMKID = Truncate-128(Hash(Pub(STA) | Pub(AP))

with Hash() using:
SHA-256: when len(p) <= 256 (DH-19)
SHA-384: when 256 < len(p) <= 384 (DH-20)
SHA-512: when 384 < len(p) (DH-21)
Due to an existing PMKID, a client is able to reassociate to an AP by using the same PMK as before and therefore only require new transmission keys. This saves some time/load on both sides of the connection and is called PMK Caching.
Security Considerations
First of all, it is rather nontransparent to the end user to know if an open SSID provides OWE or not. The Wi-Fi icon on the client device will not show a lock-symbol besides the SSID name like it does for a network that uses WPA2 or WPA3. Let’s hope that such information will be provided in further/advanced details for an SSID on every OS.
In the past, some small venues like coffee shop, bars or restaurants used a WPA2-Personal SSID with a passphrase displayed somewhere in/at the venue. They think that they introduced some sort of security instead of using an open SSID without encryption. However, this is deceptive as a publicly displayed passphrase (“Public-PSK”) enables attackers to decrypt recorded, encrypted frames quite easily. Enhanced Open should be used for that use case as it offers encryption without any credentials that need to be maintained and, more importantly, attackers can not decrypt recorded frames without breaking the Diffie-Hellman key exchange first.
For both, Enhanced Open and the described “Public-PSK” scenario, there is the possibility of an active attack. Just like HTTPS, it is also up to the user to know if the browser/client connected to the right server/AP as no authentication takes place before the secure connection is established and the server/AP side can decrypt/read all the entered user data. This means that the user has to believe that the device connected to the right AP and not an “evil twin”-AP or man in the middle (MITM) AP. Such an “evil-AP” would be able to decrypt/read/modify the exchanged data between the client and the AP.
If end-to-end security of traffic is still important (it should be!), a VPN-connection is still required on an Enhanced Open network.
Transition Mode
As the amount of clients supporting Enhanced Open will grow over time while “legacy” clients will (always?) exist and most likely outnumber the EO-clients for the next decade or even longer, a solution was designed to satisfy both types of clients. A transition mode exists that allows to configure an open SSID with an Enhanced Open “Buddy”-SSID. In contrast to WPA3-Personal, where a single SSID is used and two AKMs are part of the RSN element, the EO-Buddy-SSID requires another BSS*. This means that for each open SSID with EO-Transition Mode enabled, a “BSS1” with no RSN element (open) and a second “BSS2” with a hidden SSID and a RSN element are spawned on the same radio. Unfortunately, this increases the channel utilization as a second beacon is required, which takes up more air-time. Take a look at the following picture, that shows the two Beacons of the same open network.
“Legacy” Open Beacon in OWE Transition Mode
As shown above, the Beacon (and the Probe Response) of the open SSID, e.g. “LANCOM-OPEN”, contains new information. A vendor specific information element with the title “Wi-Fi Alliance: OWE Transition Mode” is added to it, that tells a client about the EO-Buddy-SSID called “LANCOM-OPEN-OWE” and its BSSID. An Enhanced Open capable client will use this information from the Beacon and start a (unicast) Probe Request directed to this EO-BSSID to connect to the encrypted open network automatically. A legacy client will ignore this extra information and connect to the open network just like before.
Notice: Each vendor might use a different routine to name the corresponding OWE SSID, LANCOM adds “-OWE” to the original SSID name.
Enhanced Open Transitional Mode Beacon
On the other hand, the Beacon of the BSS2 also includes this additional vendor specific information element, telling clients about the “legacy” open SSID and its BSSID.
*Background: Since the EO-SSID requires an RSN element to be part of Beacons and Probe Responses, it is inconsistent to the Beacons and Probe Responses of an open SSID, which do not include the RSN element. The RSN element typically defines the security methodology to be used for the connection, something that is not required for an “legacy” open SSID. It is expected to cause troubles if legacy clients see an RSN element for an open SSID.
KRACK-Attacks
Maybe you heard of the so called KRACK-attacks by Mathy Vanhoef [8] that breaks WPA2 without obtaining the real key (Passphrase). As Enhanced Open uses the same EAPoL 4-Way Handshake like WPA2 (and WPA3) to exchange transmission keys, it could be attacked by KRACK as well. However, if you want to get a nice WFA Enhanced Open sticker on your device, WFA makes sure that your device is “KRACK-save”.
Conclusion
The vision by the Wi-Fi Alliance for Enhanced Open is to get rid of cleartext over the air and at the same time preserving the user experience of an open SSID. Enhanced Open offers a solid method to establish a secured connection that offers enhancements to the “legacy” open networks and the “Public-PSK” scenario.
With the introduction of the transition mode, network operators can easily offer this new security standard right away, without the fear of loosing any legacy clients on their hotspot. On the other hand, it is hard to figure out, if an open network offers Enhanced Open capabilities without using a tool like Wi-Fi Explorer or inSSIDer as the Wi-Fi symbol will not show a lock symbol right next to the SSID in the scanned SSID list. Furthermore, a slight increase of air time is introduced do to the need of a second BSSID for the Enhanced Open SSID.
Network operators should keep an eye on “evil APs” to prevent active attacks on users and end users should still use VPN connections if end-to-end security is desired.
After Wi-Fi Alliance (WFA) introduced “Wi-Fi Protected Access” version 3 (WPA3) in late June of 2018 [1], vendors are pretty busy to adopt this security enhancement, which will become mandatory for WFA certifications in the future. This post introduces the changes in regards to WPA2, which is also undergoing some more robustness and consistency tests within the WPA3 program. Another post on the enhancements for unencrypted Wi-Fi networks (open SSIDs), can be found here. Now, let’s start with WPA3.
Changes to WPA2
WPA2 Connection Establishment
Before we get to the changes of WPA3, we need to know how (secure) connections are established in WPA2. The following flow graph shows the frames that are exchanged between a client (STA) and an Access Point (AP). If you want to get more details on the EAP-Key messages, I’ve got an older post about the EAP 4-Way Handshake.
WPA2 Connection Flow Chart
After EAP-Key message number 4, client and AP are ready to exchange data securely. As WPA3 makes changes to the authentication frames, we should take a detailed look at the two exchanged authentication frames in WPA2:
WPA2 Authentication Request
WPA2 Authentication Response
Cryptographic Consistency
In contrast to WPA2, WPA3 is only allowed to use the “Advanced Encryption Standard” (AES) and no longer legacy protocols like the “Temporal Key Integrity Protocol” (TKIP) or “Wired Equivalent Privacy” (WEP). Anyone, who was keen on security before and also wants fast Wi-Fi transmissions, has gotten rid of TKIP and WEP already, since 11n and 11ac only offer high throughput with AES.
Protected Management Frames (PMF)
All WPA3 devices need to use PMF, so it is activated implicitly as soon as the user selects either WPA3-Personal or WPA3-Enterprise for an SSID. PMF delivers a protection against forging management frames, e.g. an attacker can disassociate any user by claiming he is the Access Point (AP) that the client is currently connected to. Although it has been around for a longer time, even as a requirement for WFA 802.11ac (VHT) certification, the market adoption was rather low. A more detailed look into this topic is given by my previous blog post on Protected Management Frames (802.11w). WPA3 uses the “Management Frame Protection Required” mode with SHA-256 [2] for Hashes.
WPA3-Personal
Beacon with SAE
The “Pre-Shared Key” (PSK) method of WPA2 is replaced by “Simultaneous Authentication of Equals” (SAE), which offers a more robust password-based authentication. The passphrase itself is no longer used for key derivation (keyword: “Pairwise Master Key” (PMK)), the key derivation is based on “Elliptic Curve Cryptography” (ECC) or a special form of ECC with integer numbers only called “Finite Field” instead.
Simultaneous Authentication of Equals (SAE)
In the classic scenario, a client (STA) connects to an access point and the roles of supplicant (STA) and authenticator (AP) are clear. This concept doesn’t work for a mesh scenario, where two APs (two equals) are trying to establish a connection between each other and each one could have the role of supplicant or authenticator. Even worse, both APs could discover each other simultaneously and start a key handshake immediately, which could mess up their internal state machine. For 802.11s, the mesh Amendment for the 802.11 standard, a new connection method called “Simultaneous Authentication of Equals” got rid of this problem, so that it is now possible to authenticate each other at the same time and independently of any role.
SAE also offers a much better method of establishing a secure connection over an unsecure medium – the Diffie-Hellman (DH) key exchange [3] in combination with a Prime Modulus Group or an Elliptic Curve Group. Since the later is made mandatory for WPA3-Personal, the following explanations refer to it. There already exist some predefined curves as DH groups 19, 20 and 21 (group order r) with given prime numbers p of certain (bit-)lengths. For example DH19 refers to the 256-bit elliptic curve defined as NIST p-256 [4] with the prime number p = 2^(256) – 2^(224) + 2(192) + 2(96) – 1 = 1,157920892×10⁷⁷ and the elliptic curve equation: y2 = x3 – 3x + b, where b is given by a certain 384 bit number.
Establishing a Pairwise Master Key in SAE with ECC
The following paragraphs require knowledge about hash functions, scalars, points/vectors and operations on them. Please jump to the next section, called “WPA3-Personal Connection Establishment”, in case you are not interested in this detailed explanation.
SAE is build upon the Dragonfly Key Exchange, which is described in [5], this text refers to it with some simplifications. We keep the mesh context with two APs that want to connect to each other, but the same concept applies to an AP-STA connection in WPA3-Personal. Both APs start with a hashed presentation of the entered/stored passphrase. This hash-function H concatenates (symbolized by “|”), their identities (MACs), the passphrase and an integer value i. The sequence of the elements, that are put into this hash-function is important and as SAE allows simultaneous authentication, the sequence is defined by a greater/smaller comparison of the involved AP-MACs, so that both parties use the same sequence of inputs for the hashed password representation:
The hashed password is then transformed into a point represented by x, y coordinates. All we need is a “Key Derivation Function” (KDF) that stretches a string to a certain length len (length of prime p) and performs modulo p-1 on the result. After that, y is calculated by entering the calculated x in the equation f(x) of the elliptic curve and getting the square root (sqrt) of the result.
x = ((KDF(hashed_password, len)) mod (p-1)) + 1
y = sqrt(f(x))
P = (x, y)
If the generated x, y coordinates do not match a point on the elliptic curve, the integer i is increased by one and the procedure is started again. Otherwise, each party chooses two random numbers, private and mask to calculate two new values, a new point new_point and a scalar scal like this (r is the order of the elliptic curve DH group):
scal = (private + mask) mod r
new_point = inverse(mask • P)
Note that the new_point includes x, y coordinates, whereas a scalar is a single number. A scalar and an elliptic curve point can be multiplied (•), please see this wikipedia article [6, wikipedia article] for more details about scalar multiplications of elliptic curve points.
Both parties send their scal and elem to the other one, so that each party has scal(AP1), scal(AP2), new_point(AP1) and new_point(AP2). This material is used to calculate a new point K, which is the new shared secret between AP1 and AP2.
The ◊ symbol represents the point operation, which in case of elliptic curve is an addition of two points that result in a new point on the curve. Again, please see this wikipedia article [6, wikipedia article] for more details on additions of two elliptic curve points.
Since scal(APx) • P(x, y) is another point, the scalar multiplied point of e.g. scal(AP2) • P(x, y) is added to the new_point(AP2) and afterwards multiplied by private(AP1). As both parties need to confirm that their calculation of K is correct, a bijective function F is required that maps a point K to a single number again, which is then used to create a token for each party:
Note that tok(AP1) ≠ tok(AP2) as hash functions with different sequences of input values result in different values. Nonetheless, both parties are able to verify the token of the other party by calculating the other token themselves and compare it to the one they received. In case the tokens could be confirmed, the “Pairwise Master Key” (PMK) is calculated by the hash-function H as follows:
PMK = H(k | scal(AP1) + scal(AP2) mod r)
Important to know is, that this PMK is not based on the passphrase itself, but on scalars and points that were calculated with random numbers, which only used a hashed version of the passphrase. Each time these random numbers change, the PMK will be different and that brings us perfect forward secrecy.
With an established PMK, the “Personal Transition Key” (PTK) can be set up during the EAP 4-Way Handshake and secure data transmissions between AP and client are enabled.
Note: If you got the mathematical background to understand the further details of elliptic curves, there is a great blog post series by Andrea Corbellini, which explains it pretty well [7].
Attack Resistance
Offline-Dictionary: Although an attacker can sniff the scalars, it is infeasible to calculate private or mask and therefore is unable to use the transmitted tokens to check if a guessed passphrase is correct.
Active-Attack: Again, as private and mask are infeasible to calculate, an active attacker will fail to create a valid token. Furthermore, due to the discrete logarithm problem, calculations of P(x, y) with faked private and mask values are also infeasible. More details can be found in [8].
Side-Channel: As calculation can take different amount of power and/or time to calculate, the algorithm will always use a certain amount of iterations to create the hashed_password even if it found a point on the curve already. The fixed amount of iterations should at least be large enough, that it is possible to find a valid point without any extra iterations required.
WPA3-Personal Connection Establishment
The main difference to the WPA2 connection flow chart are the two extra authentication frames. This is the WPA3 connection flow chart with a detailed look at the authentication frames:
WPA3 Connection Flow Chart
WPA3 Authentication Messages
All four authentication frames for WPA3-Personal contain important information to calculate the PMK based on Elliptic Curve Cryptography (ECC). As mentioned in “Establishing a Pairwise Master Key (PMK) in SAE with ECC”, the station and the access point need to know the calculated scalar and point (Finite Field Element) of the other party. These information are shared in the first two authentication frames:
WPA3 Authentication 1/4
WPA3 Authentication 2/4
The last two authentication frames contain the token as confirmation.
WPA3 Authentication 3/4
WPA3 Authentication 4/4
If the confirmation information is correct, the association/connection of the station can continue.
Offline Dictionary Attacks and Key Recovery Resistance
WPA3-Personal prohibits offline dictionary attacks, where an attacker uses a dictionary of “passphrases” on a passively observed WPA3-Personal key exchange to obtain the correct passphrase. As shown above, ECC offers (perfect) forward secrecy of recorded network traffic, even if the attacker was able to obtain the correct passphrase, e.g. via social engineering, he can not decrypt other sessions as the passphrase is not part of the PMK anymore. Nonetheless, the attacker can access your network with an obtained passphrase.
Bruteforcing or Denial of Service (DoS) Attacks
Since offline dictionary attacks are mitigated, an attacker might move to bruteforcing the passphrase against the SSID. Furthermore, the use of ECC requires some calculation power on a device, which could be exploited by DoS attacks with multiple connection attempts. Both attacks are prohibited by WPA3-Personal due to an anti-clogging feature. As soon as an AP notices too many SAE connection requests, it will use tokens to limit the amount of simultaneous attempts and thus makes it harder to bruteforce or DoS.
Password Complexity
As the password/passphrase is no longer part of the PMK, the complexity of it does no longer play an important role. Therefore, it is suitable to use passwords that are easy to enter and remember. However, you should still go for a complex enough password, so that an attacker is unable to guess your passphrase within a short amount of time. Although offline dictionary attacks are prevented, the access to your network with a guessed passphrase is still possible.
Transition Mode
Beacon with SAE Transition Mode
Adoption is key and WFA made sure that it is possible to deploy WPA3 as soon as possible by creating a transition mode. This mode allows WPA2 and WPA3 at the same time and on the same SSID. However, this makes the SSID only PMF optional and not PMF required and a hacker could still gain access on your network via WPA2 attacks.
Note: We found an issue within iOS 11.x and 12.0, that an iPhone/iPad does not connect to an SSID using this WPA3 transition mode. However, a Macbook with macOS 10.12 has no issues. Neither macOS nor iOS support WPA3 (yet), but at least the WPA2 connection should work. Apple has fixed this issue in iOS 12.2.
2nd Note: As Windows 10 with latest updates has “SAE” as an option for Wi-Fi security, we’ve seen Surface devices trying to connect with this option. Unfortunately, the shipped Marvell driver is not yet capable of SAE, so the client won’t connect to the SSID. Furthermore, in transition mode, the client won’t connect using WPA2-PSK as it tries to use SAE as default and even a manually configured profile for the SSID with WPA2-PSK selected doesn’t work.
WPA3-Enterprise
Unfortunately, there is no big update for the enterprise world except an optional 192-bit security mode. In the mandatory version, WPA3-Enterprise is WPA2-Enterprise + “PMF optional/required” (both configuration options are valid) and nothing else. There is no use of SAE/ECC in WPA3-Enterprise and no standard support for fast roaming (802.11r).
Optional 192-bit security mode
Beacon with WPA3-Enterprise 192-bit Security Mode
Some sensitive security enterprises/governmental/military sites require a consistent use of network security. With the optional 192-bit security mode, WPA3-Enterprise makes sure that the AP, the RADIUS server and the client use (at least) 192-bit keys, so that there is no weak link in this setup. The WPA3-Enterprise 192-bit security mode uses 256-bit “Galois/Counter Mode Protocol” (GCMP-256) for authenticated encryption, 384-bit “Hashed Message Authentication Mode” (HMAC) with “Secure Hash Algorithm” (HMAC-SHA-384) for key derivation and confirmation, and “Elliptic Curve Diffie-Hellman” (ECDH) exchange and “Elliptic Curve Digital Signature Algorithm” (ECDSA) using a 384-bit elliptic curve for key establishment and authentication.
Note: The bad news is that all involved parties (access points, clients and RADIUS-server) need to support this 192-bit security mode, otherwise no connection can be established at all. Furthermore, you should keep in mind, that an 192-bit 802.1X SSID should also be separated/encapsulated from other traffic in your network. Otherwise, someone could identify the weakest “entrance” by looking for other, non-192-bit-mode SSIDs connected to the same network and attack them.
KRACK-Attacks
Maybe you heard of the so called KRACK-attacks by Mathy Vanhoef [9] that breaks WPA2 without obtaining the real key (Passphrase). You might expect that WPA3 will be secure since it is newer than WPA2 and released nearly one year after the KRACK-attacks were released, but that is a misconception. As the development of WPA3 started in 2012, long before the KRACK-attacks came to life, and rely on the same EAPoL 4-Way Handshake to exchange transmission keys, WPA3 could be attacked by KRACK as well. However, if you want to get a nice WFA WPA3 sticker on your device, WFA makes sure that your device is “KRACK-save”. Visit the link [9] for more information about the attack itself.
Mathy’s Analysis of WPA3
In April 2019, Mathy Vanhoef published a paper [10] on the WPA3-Personal part of WPA3 and also published security issues in EAP-pwd. Please note that EAP-pwd is not part of WPA3, but uses a similar method like SAE to connect to an enterprise network. He did not find any issues that compromise the security of SAE itself, but for some features that come-along with it. Please note that WPA3 itself is still considered secure and is a major update over WPA2. As it is still in its early phase of adoption, WFA will make sure that everything that can be done to mitigate the mentioned issues, will be done.
He was able to identify a side channel attack on the hostap implementation (commit 0eb34f8f2 from 2019-01-26) to leak enough information to compute the used password. Since the hostap is a very popular implementation to handle WPA security and is often used as a code reference for other implementations, this is a critical issue. To utilize this, an attacker needs to run a compromised application on the user device. Most Access Points do not allow any third party applications to be installed, but a user device like a smartphone could be attacked that way. Nonetheless, this issue can and will be fixed via software updates.
Furthermore, the WPA3 Transition Mode has the downside of using the same password for WPA2 and WPA3. Even if there are only WPA3 capable devices, that are required to be downwards compatible to WPA2, an attacker can spawn an evil twin AP with the same SSID with WPA2 only. A client device might then start to auto-connect using WPA2 to this evil twin AP. Although the client will notice that it has been tricked as soon as EAP message 3 arrives and the RSN element of the evil twin does not match the RSN elemt of the original network, a dictionary attack with the already gained information might be successful. Clients, once they connected to a (B)SSID via WPA3, should considering storing this key method and not use auto-connect if the same (B)SSID wants to use WPA2. The upcoming Android Q has implemented this (as of current BETA).
Additionally, the negotiation of the DH-group to be used can be manipulated to downgrade or upgrade the client to a lower or higher group than initially intended. However, all DH-groups 19 (mandatory), 20 (optional) and 21 (optional) are considered secure (at the moment). This issue could only be solved by changing the SAE protocol exchange in IEEE 802.11, which would break interoperability with current SAE implementations.
At last, the anti-clogging feature can be defeated if the attacker is able to replay the generated tokens to the AP. The severity of this issue can be mitigated by letting the SAE token/key calculation be run as a low-priority job, so that other jobs like data traffic is not that much affected. To resolve this issue, the SAE anti-clogging mechanism would need to be revised in IEEE 802.11, which would also break interoperability with current SAE implementations.
Conclusion
After several years of development, WPA3 improves the security for personal (PSK) networks tremendously but leaves a lot to desire for the enterprise sector.
The introduction of a transition mode is a nice way to let people install WPA3-Personal along with WPA2-Personal. On the one hand, WPA3-Personal can be implemented on existing hardware, which will drive vendor support, and on the other hand, users can use the transitional mode to deploy WPA3 on their network already and wait for client device or firmware upgrades in the meantime. As WPA3 will be mandatory for 802.11ax (High Efficiency WLAN), my guess is, that we will see a lot of WPA3 support with the next round of smartphone updates in 2019. One of the first client implementations available is the Google’s Pixel 3 (Plus) with Android Q BETA.
The mandatory part of WPA3-Enterprise should also be easy to implement since it is just WPA2-Enterprise together with PMF. For the optional 192-bit security mode, all devices require an upgrade and furthermore, network admins need to know how to configure this setup correctly.
For the future, it would be great to see more upgrades for the enterprise market, especially since “Fast Roaming” (802.11r) was left out of the current WPA3-“Standard” (for personal and enterprise networks).
Feel free to comment on this post, especially to correct any errors in this post.
We recently got a bug entry claiming that an iPhone with iOS 10.3.2 fails to connect to a 802.1X SSID if PMF is mandatory/required, but can connect to our AP if WPA-PSK is used instead. Since we do have iPhones here, it was easy to reproduce the issue and take a look at the connection behavior of AP and station (STA), which reveals where things go wrong. Furthermor not only iOS devices like iPhone and iPad are affected, but also macOS clients like a Macbook Pro.
Apple and PSK
PSK and PMF optional
Let’s start simple with a SSID that uses WPA2-PSK for encryption and mark this SSID PMF opional/capable so that the Auth Key Management (AKM) type is set to “PSK (0x02)”. The iPhone will connect to the SSID just fine.
PSK and PMF required
So far so good, we go on with WPA2-PSK and PMF mandatory/required. Looking at the RSN ASM type, we do see “PSK (SHA256) (0x06)” for key hashes with SHA-256 now. Again, the client can connect to the SSID.
Apple and 802.1X
802.1X and PMF optional
Now, let’s repeat this for an EAP-PEAP based 802.1X SSID and PMF optional/capable. Within Beacons and Probe Requests, the AP announces RSN AKM type “WPA (0x01)” and the client can connect with the right credentials. The “Association Request” from the STA contains a RSN element with AKM type “WPA” and “Management Frame Protection Capable” capability.
802.1X and PMF required
The critical part is 802.1X with PMF required, where the AP uses RSN AKM type “WPA (SHA256) (0x05)” and advertises “Management Frame Protection Capable” and “Management Frame Protection Required” capabilities.
Somehow this type seems to be missing within Apples implementation on iOS and macOS, because both OSes will tell the user that he tries to connect to a WPA-PSK SSID! My guess is, that this is the fallback/default AKM within the OS. I took a screenshot on a Macbook with WiFi Explorer in the background showing AKM Suite “WPA (SHA256)” as well for a PMF mandatory 802.1X SSID.
Furthermore, after the Authentication frames, the client sends an Association Request with no RSN information element present. This is causing the connection problem.
Without the RSN element, the AP still answers with an Association Response, frame 13, but does not start the EAP phase afterwards.
Is it really Apple messing things up?
You could still blame that our LANCOM AP does something wrong so the STA gets confused and misbehaves. So I double checked with a Cisco WLC 2504 and AP3600 and got the same behavior.
Furthermore I got a hold on a Nokia/Microsoft Lumia 950, which is Wi-Fi Alliance 802.11ac certified [1] (PMF certification is a must for that), and checked against a LANCOM AP with 802.1X, PMF mandatory/required. The phone sends the required RSN information element within its “Association Request” and can connect! You can see the EAP phase starting right after the “Association Response” from the AP.
Conclusion
Altough Apple is quite keen on getting into the enterprise business with their devices and they recently announced partnership with Cisco Systems, the typical enterprise authentication method 802.1X together with PMF is not fully supported. It is suprising to see that Apple fails on both OSes, iOS and macOS, with the same error.
While Apple did WFA certification for 11n devices up to iPhone 5s, there has been no 802.11ac WFA certification for an iPhone. [2]
Based on my previous post on how to send WLAN frames via Scapy, see Using Scapy to send WLAN frames, I want to demonstrate how to establish a connection to an unencrypted SSID with a WLAN interface that we control. I highly recommend reading my previous post if you aren’t already familiar with Scapy and Python.
Pleate note: The following commands were made on an Ubuntu 16.04 Linux system with a TP-Link TL-WN727N (v4.1) WLAN USB Stick. This WLAN USB stick is capable of sending ACKs within the required timeout, although the device is used in monitor mode, as long as its real MAC address is used as STA MAC. The scapy package can be installed as python-scapy (Ubuntu) or just scapy (Fedora), wireshark is also required. Your linux and python skills should be quite solid and include knowledge about the use of ifconfig and iwconfig in linux as well as class definition and inheritance in python.
Required packets for a WLAN connection
Without going into too much detail here, we basically just need two types of packets to connect to an AP – an Authentication frame and an Association Request.
Authentication Frame
For an authentication frame, Scapy already offers the required protocols Dot11() and Dot11Auth(). All we need to do is determine a STA MAC and a BSSID. With algo=0, the open system authentication algorithm is used, a sequence number of 1 is chosen by seqnum=0x0001 and the status code 0 means successful. This is the full command for the authentication frame:
If we take a look at the packet in wireshark, we can see that the given interpretation of the fields fits:
Association Request
This one is a rather difficult frame to create. It requires knowledge about parameters that are present in the Beacon like the supported rates field. This data has to be present within our association request, otherwise a LANCOM AP will reject the association of this client. In the following example we want to connect to an AP that supports .11g and .11n, but no .11b. If you are using a different AP or setting, some other rates/fields might be mandatory as well.
Let’s start with the basic packet that consists of Dot11, Dot11AssoReq and Dot11Elt. Besides the BSSID and STA MAC, the SSID NAME (ESSID) needs to be known as well to create the association request packet. The SSID is written to the info field of an 802.11 information element (Dot11Elt) with ID=0.
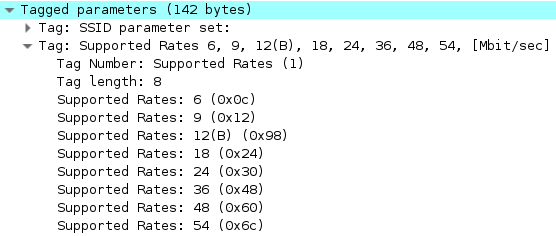
As I’ve mentioned before, we also need to add the information field for supported rates, that matches the one from the AP Beacons. We can just sniff the Beacons and copy the values to our own definition of a supported rates information field. How to do it is given in the section Creating a customized packet in my previous post. So I just show you the Python code below.
Supported Rates field in Beacon
from scapy.all import *

class Dot11EltRates(Packet):
    """ Our own definition for the supported rates field """
    name = "802.11 Rates Information Element"
    # Our Test STA supports the rates 6, 9, 12, 18, 24, 36, 48 and 54 Mbps
    supported_rates = [0x0c, 0x12, 0x18, 0x24, 0x30, 0x48, 0x60, 0x6c]
    fields_desc = [ByteField("ID", 1), ByteField("len", len(supported_rates))]
    for index, rate in enumerate(supported_rates):
        fields_desc.append(ByteField("supported_rate{0}".format(index + 1),
                                     rate))
Python Files
Receiving and Sending packets
We create a Python file to receive and send packets with our monitoring interface and name it “monitor_ifc.py”. First of all, we add our Rates Info element as a class named “Dott11EltRates” and then create a new class called “Monitor”. The class is initialized with the name of the monitor interface, a STA MAC and the BSSID to connect to. The boolean variables “auth_found” and “assoc_found” are used to check if authentication/association responses were seen. Our Dot11EltRates class is assigned to a dot11_rates variable.
from scapy.all import *

class Dot11EltRates(Packet):
    """
    Our own definition for the supported rates field
    """
    name = "802.11 Rates Information Element"
    # Our Test AP has the rates 6, 9, 12 (B), 18, 24, 36, 48 and 54, with 12
    # Mbps as the basic rate - which does not have to concern us.
    supported_rates = [0x0c, 0x12, 0x18, 0x24, 0x30, 0x48, 0x60, 0x6c]

    fields_desc = [
        ByteField("ID", 1),
        ByteField("len", len(supported_rates))
        ]

    for index, rate in enumerate(supported_rates):
        fields_desc.append(ByteField("supported_rate{0}".format(
            index + 1), rate))

class Monitor:
    def __init__(self, mon_ifc, sta_mac, bssid):
        """

        :param mon_ifc: WLAN interface to use as a monitor
        :param channel: Channel to operate on
        :param sta_mac: MAC address of the STA
        :param bssid: BSSID of the AP to attack
        """
        self.mon_ifc = mon_ifc
        self.sta_mac = sta_mac
        self.bssid = bssid
        self.auth_found = False
        self.assoc_found = False
        self.dot11_rates = Dot11EltRates()
Out first method of the Monitor class is “send_packet”, which simply sends a given Scapy packet. However, if the packet type is an Association Request, we add the dot11_rates informatation prior to sending it.
    def send_packet(self, packet, packet_type=None):
        """

        :param packet_type: Specific types require a special handling
        :param packet: This is our packet to be sent
        :return:
        """
        # Send out the packet
        if packet_type is None:
            send(packet)
        elif packet_type == "AssoReq":
            packet /= self.dot11_rates
            send(packet)
        else:
            print("Packet Type '{0}' unknown".format(packet_type))
As we need to check if the AP sends an Authentication Response, the method “search_auth()” uses the sniffing function from Scapy to look for packets matching the lfilter, x is a sniffed packet, as long as no timeout occurs or the stop_filter is True. The method “check_auth()” as stop filter just looks for matching addresses within a given frame, the matching frame type is checked by “x.haslayer(Dot11Auth)” within the lfilter of search_auth(). So if a packet has the Dot11Auth layer, we check if the addresses also match to our defined ones. The parameter mp_queue is a multiprocessing queue to return values from multiprocessed processes, which returns True or False in this case.
    def check_auth(self, packet):
        """
        Try to find the Authentication from the AP

        :param packet: sniffed packet to check for matching authentication
        """
        seen_receiver = packet[Dot11].addr1
        seen_sender = packet[Dot11].addr2
        seen_bssid = packet[Dot11].addr3

        if self.bssid == seen_bssid and \
            self.bssid == seen_sender and \
                self.sta_mac == seen_receiver:
            self.auth_found = True
            print("Detected Authentication from Source {0}".format(
                seen_bssid))
        return self.auth_found

    def search_auth(self, mp_queue):
        print("\nScanning max 5 seconds for Authentication "
              "from BSSID {0}".format(self.bssid))
        sniff(iface=self.mon_ifc, lfilter=lambda x:
                  x.haslayer(Dot11Auth),
              stop_filter=self.check_auth,
              timeout=5)
        mp_queue.put(self.auth_found)
As we also need to check for an Association Response, we nearly do the same, except that we check if the packet has the Dot11AssoResp layer.
    def check_assoc(self, packet):
        """
        Try to find the Association Response from the AP

        :param packet: sniffed packet to check for matching association
        """
        seen_receiver = packet[Dot11].addr1
        seen_sender = packet[Dot11].addr2
        seen_bssid = packet[Dot11].addr3

        if self.bssid == seen_bssid and \
            self.bssid == seen_sender and \
                self.sta_mac == seen_receiver:
            self.assoc_found = True
            print("Detected Association Response from Source {0}".format(
                seen_bssid))
        return self.assoc_found

    def search_assoc_resp(self, mp_queue):
        print("\nScanning max 5 seconds for Association Response "
              "from BSSID {0}".format(self.bssid))
        sniff(iface=self.mon_ifc, lfilter=lambda x: x.haslayer(Dot11AssoResp),
              stop_filter=self.check_assoc,
              timeout=5)
        mp_queue.put(self.assoc_found)
To wrap things up, here is the complete code of the “monitor_ifc.py”:
from scapy.all import *

class Dot11EltRates(Packet):
    """
    Our own definition for the supported rates field
    """
    name = "802.11 Rates Information Element"
    # Our Test AP has the rates 6, 9, 12 (B), 18, 24, 36, 48 and 54, with 12
    # Mbps as the basic rate - which does not have to concern us.
    supported_rates = [0x0c, 0x12, 0x18, 0x24, 0x30, 0x48, 0x60, 0x6c]

    fields_desc = [
        ByteField("ID", 1),
        ByteField("len", len(supported_rates))
        ]

    for index, rate in enumerate(supported_rates):
        fields_desc.append(ByteField("supported_rate{0}".format(
            index + 1), rate))

class Monitor:
    def __init__(self, mon_ifc, sta_mac, bssid):
        """

        :param mon_ifc: WLAN interface to use as a monitor
        :param channel: Channel to operate on
        :param sta_mac: MAC address of the STA
        :param bssid: BSSID of the AP to attack
        """
        self.mon_ifc = mon_ifc
        self.sta_mac = sta_mac
        self.bssid = bssid
        self.auth_found = False
        self.assoc_found = False
        self.dot11_rates = Dot11EltRates()

    def send_packet(self, packet, packet_type=None):
        """
        Send and display a packet.

        :param packet_type: Specific types require
        :param packet:
        :return:
        """
        # Send out the packet
        if packet_type is None:
            send(packet)
        elif packet_type == "AssoReq":
            packet /= self.dot11_rates
            send(packet)
        else:
            print("Packet Type '{0}' unknown".format(packet_type))

    def check_auth(self, packet):
        """
        Try to find the Authentication from the AP

        :param packet: sniffed packet to check for matching authentication
        """
        seen_receiver = packet[Dot11].addr1
        seen_sender = packet[Dot11].addr2
        seen_bssid = packet[Dot11].addr3

        if self.bssid == seen_bssid and \
            self.bssid == seen_sender and \
                self.sta_mac == seen_receiver:
            self.auth_found = True
            print("Detected Authentication from Source {0}".format(
                seen_bssid))
        return self.auth_found

    def check_assoc(self, packet):
        """
        Try to find the Association Response from the AP

        :param packet: sniffed packet to check for matching association
        """
        seen_receiver = packet[Dot11].addr1
        seen_sender = packet[Dot11].addr2
        seen_bssid = packet[Dot11].addr3

        if self.bssid == seen_bssid and \
            self.bssid == seen_sender and \
                self.sta_mac == seen_receiver:
            self.assoc_found = True
            print("Detected Association Response from Source {0}".format(
                seen_bssid))
        return self.assoc_found

    def search_auth(self, mp_queue):
        print("\nScanning max 5 seconds for Authentication "
              "from BSSID {0}".format(self.bssid))
        sniff(iface=self.mon_ifc, lfilter=lambda x: x.haslayer(Dot11Auth),
              stop_filter=self.check_auth,
              timeout=5)
        mp_queue.put(self.auth_found)

    def search_assoc_resp(self, mp_queue):
        print("\nScanning max 5 seconds for Association Response "
              "from BSSID {0}".format(self.bssid))
        sniff(iface=self.mon_ifc, lfilter=lambda x: x.haslayer(Dot11AssoResp),
              stop_filter=self.check_assoc,
              timeout=5)
        mp_queue.put(self.assoc_found)
Establish the connection
So let’s move on to the actual connection establishment. We create a new file called “connection_phase.py”, import multiprocessing, scapy and the Monitor class from the “monitor_ifc.py”. Then we create the class “ConnectionPhase” with a connection state as a string, the monitor interface to be used, the STA MAC and the BSSID.
import multiprocessing
from scapy.all import *

from monitor_ifc import Monitor

class ConnectionPhase:
    """
    Establish a connection to the AP via the following commands
    """

    def __init__(self, monitor_ifc, sta_mac, bssid):
        self.state = "Not Connected"
        self.mon_ifc = monitor_ifc
        self.sta_mac = sta_mac
        self.bssid = bssid
Our first method creates an authentication packet and uses a list of jobs for multiprocessing. Since we want to send the packet and check if we receive an answer from the AP, we parallelize the sending and receiving jobs via multiprocessing.Process(target=[…],args=(arg1, …)) and add them to the list of jobs which will be started and joined afterwards. If the return value in our message queue is True, we will set the internal state to “Authenticated”.
    def send_authentication(self):
        """
        Send an Authentication Request and wait for the Authentication Response.
        Which works if the user defined Station MAC matches the one of the
        WLAN ifc itself.

        :return: -
        """
        packet = Dot11(
            addr1=self.bssid,
            addr2=self.sta_mac,
            addr3=self.bssid) / Dot11Auth(
                algo=0, seqnum=0x0001, status=0x0000)
        packet.show()

        jobs = list()
        result_queue = multiprocessing.Queue()
        receive_process = multiprocessing.Process(
            target=self.mon_ifc.search_auth,
            args=(result_queue, ))
        jobs.append(receive_process)
        send_process = multiprocessing.Process(
            target=self.mon_ifc.send_packet,
            args=(packet, ))
        jobs.append(send_process)

        for job in jobs:
            job.start()
        for job in jobs:
            job.join()

        if result_queue.get():
            self.state = "Authenticated"
For the Association Request frame most of the code is the same, we first check if our internal state matches “Authenticated” before creating the frame based on the Dot11AssReq from Scapy. The parameter “ssid” will be part of the 802.11 information element that includes the SSID name (ESSID). If we get a True in our message queue, the internal state is set to “Associated”.
    def send_assoc_request(self, ssid):
        """
        Send an Association Request and wait for the Association Response.
        Which works if the user defined Station MAC matches the one of the
        wlan ifc itself.

        :param ssid: Name of the SSID (ESSID)
        :return: -
        """
        if self.state != "Authenticated":
            print("Wrong connection state for Association Request: {0} "
                  "- should be Authenticated".format(self.state))
            return 1

        packet = Dot11(
            addr1=self.bssid,
            addr2=self.sta_mac,
            addr3=self.bssid) / Dot11AssoReq(
                cap=0x1100, listen_interval=0x00a) / Dot11Elt(
                    ID=0, info="{}".format(ssid))
        packet.show()
jobs = list()
        result_queue = multiprocessing.Queue()
        receive_process = multiprocessing.Process(
            target=self.mon_ifc.search_assoc_resp,
            args=(result_queue,))
        jobs.append(receive_process)
        send_process = multiprocessing.Process(
            target=self.mon_ifc.send_packet,
            args=(packet, "AssoReq", ))
        jobs.append(send_process)

        for job in jobs:
            job.start()
        for job in jobs:
            job.join()

        if result_queue.get():
            self.state = "Associated"
Last but not least we need code to establish the connection by calling these methods from the ConnectionPhase class. In this example, a main function within the “connection_phase.py” will do this. We also use fix values for our monitoring interface, STA MAC, BSSID and ESSID, but it is also possible to hand them over as arguments from the command line. Check your “iwconfig” to get the full name of the monitor WLAN interface and “ifconfig” to get its MAC. Furthermore the BSSID and the ESSID have to be known.
def main():
    monitor_ifc = "wlx60e327xxyyzz"
    sta_mac = "60:e3:27:xx:yy:zz"
    bssid = "00:a0:57:aa:bb:cc"
    conf.iface = monitor_ifc

    # MACs are converted to always use lowercase
    mon_ifc = Monitor(monitor_ifc, sta_mac.lower(), bssid.lower())

    connection = ConnectionPhase(mon_ifc, sta_mac, bssid)
    connection.send_authentication()
    if connection.state == "Authenticated":
        print("STA is authenticated to the AP!")
    else:
        print("STA is NOT authenticated to the AP!")
    time.sleep(1)
    connection.send_assoc_request(ssid="SSID-NAME")

    if connection.state == "Associated":
        print("STA is connected to the AP!")
    else:
        print("STA is NOT connected to the AP!")

if __name__ == "__main__":
    sys.exit(main())
Our code of “connection_phase.py” is now complete, the code is given below.
import multiprocessing
from scapy.all import *

from monitor_ifc import Monitor

class ConnectionPhase:
    """
    Establish a connection to the AP via the following commands
    """

    def __init__(self, monitor_ifc, sta_mac, bssid):
        self.state = "Not Connected"
        self.mon_ifc = monitor_ifc
        self.sta_mac = sta_mac
        self.bssid = bssid

    def send_authentication(self):
        """
        Send an Authentication Request and wait for the Authentication Response.
        Which works if the user defined Station MAC matches the one of the
        wlan ifc itself.

        :return: -
        """
        packet = Dot11(
            addr1=self.bssid,
            addr2=self.sta_mac,
            addr3=self.bssid) / Dot11Auth(
                algo=0, seqnum=0x0001, status=0x0000)

        packet.show()

        jobs = list()
        result_queue = multiprocessing.Queue()
        receive_process = multiprocessing.Process(
            target=self.mon_ifc.search_auth,
            args=(result_queue, ))
        jobs.append(receive_process)
        send_process = multiprocessing.Process(
            target=self.mon_ifc.send_packet,
            args=(packet, ))
        jobs.append(send_process)

        for job in jobs:
            job.start()
        for job in jobs:
            job.join()

        if result_queue.get():
            self.state = "Authenticated"

    def send_assoc_request(self, ssid):
        """
        Send an Association Request and wait for the Association Response.
        Which works if the user defined Station MAC matches the one of the
        wlan ifc itself.

        :param ssid: Name of the SSID (ESSID)
        :return: -
        """
        if self.state != "Authenticated":
            print("Wrong connection state for Association Request: {0} "
                  "- should be Authenticated".format(self.state))
            return 1

        packet = Dot11(
            addr1=self.bssid,
            addr2=self.sta_mac,
            addr3=self.bssid) / Dot11AssoReq(
                cap=0x1100, listen_interval=0x00a) / Dot11Elt(
                    ID=0, info="{}".format(ssid))
        packet.show()
jobs = list()
        result_queue = multiprocessing.Queue()
        receive_process = multiprocessing.Process(
            target=self.mon_ifc.search_assoc_resp,
            args=(result_queue,))
        jobs.append(receive_process)
        send_process = multiprocessing.Process(
            target=self.mon_ifc.send_packet,
            args=(packet, "AssoReq", ))
        jobs.append(send_process)

        for job in jobs:
            job.start()
        for job in jobs:
            job.join()

        if result_queue.get():
            self.state = "Associated"

def main():
    monitor_ifc = "wlx60e327xxyyzz"
    sta_mac = "60:e3:27:xx:yy:zz"
    bssid = "00:a0:57:aa:bb:cc"
    conf.iface = monitor_ifc

    # mac configuration per command line arguments, MACs are converted to
    # always use lowercase
    mon_ifc = Monitor(monitor_ifc, sta_mac.lower(), bssid.lower())

    connection = ConnectionPhase(mon_ifc, sta_mac, bssid)
    connection.send_authentication()
    if connection.state == "Authenticated":
        print("STA is authenticated to the AP!")
    else:
        print("STA is NOT authenticated to the AP!")
    time.sleep(1)
    connection.send_assoc_request(ssid="SSID-NAME")

    if connection.state == "Associated":
        print("STA is connected to the AP!")
    else:
        print("STA is NOT connected to the AP!")

if __name__ == "__main__":
    sys.exit(main())
We can now execute the code in a Linux bash via “sudo python3 connection_phase.py”, the sudo rights are required to send/receive with our monitor interface. Given below is the output of our tool, with the made up MACs for security reasons.
###[ 802.11 ]###
 subtype = 11
 type = Management
 proto = 0
 FCfield =
 ID = 0
 addr1 = 00:a0:57:aa:bb:cc
 addr2 = 60:e3:27:xx:yy:zz
 addr3 = 00:a0:57:aa:bb:cc
 SC = 0
 addr4 = 00:00:00:00:00:00
 ###[ 802.11 Authentication ]###
 algo = open
 seqnum = 1
 status = success

Scanning max 5 seconds for Authentication from BSSID 00:a0:57:aa:bb:cc
 .
 Sent 1 packets.
 Detected Authentication from Source 00:a0:57:aa:bb:cc
STA is authenticated to the AP!

###[ 802.11 ]###
 subtype = 0
 type = Management
 proto = 0
 FCfield =
 ID = 0
 addr1 = 00:a0:57:aa:bb:cc
 addr2 = 60:e3:27:xx:yy:zz
 addr3 = 00:a0:57:aa:bb:cc
 SC = 0
 addr4 = 00:00:00:00:00:00
 ###[ 802.11 Association Request ]###
 cap = ESS+privacy
 listen_interval= 10
 ###[ 802.11 Information Element ]###
 ID = SSID
 len = None
 info = 'SSID-NAME'
 ###[ 802.11 Rates Information Element ]###
 ID = 1
 len = 8
 supported_rate1= 12
 supported_rate2= 18
 supported_rate3= 24
 supported_rate4= 36
 supported_rate5= 48
 supported_rate6= 72
 supported_rate7= 96
 supported_rate8= 108

Scanning max 5 seconds for Association Response from BSSID 00:a0:57:aa:bb:cc
 .
 Sent 1 packets.
 Detected Association Response from Source 00:a0:57:aa:bb:cc
STA is connected to the AP!
From this point on, you can send any frame, even frames that usually require a valid connection, to interact with the AP. May this little tool be useful to you and if you got any questions, feel free to ask them within the comment section. Thanks for reading.
Scapy[1] is one mighty python tool to create, receive and manipulate various network packets and it comes with a very handy CLI as well. If you ever had the need to create specific network packets within a program, I suggest you use python together with scapy to do so. Let’s start with a short introduction to the scapy CLI and end with a small example of scapy within python code. With the right kind of WLAN interface it is even possible to create a connection to an unencrypted SSID and I am going to publish the steps to do so in another post.
Pleate note: The following commands were made on a Fedora 23 Linux system with an TP-Link TL-WN727N (v4.1) WLAN USB Stick. The scapy package can be installed as python-scapy (Ubuntu) or just scapy (Fedora), wireshark is also required. Your linux and python skills should be quite solid and include knowledge about the use of ifconfig and iwconfig in linux as well as class definition and inheritance in python.
Scapy CLI
After using a bash to call “scapy”, the CLI should show up and should look like this (Your version might be different):
Welcome to Scapy (2.2.0)
>>>
You can take a look at all the predefined protocols via the “ls()” command…
A quick example of how to send a Dot11 frame, e.g. a Null Frame, from an AP (e.g. MAC = 00:a0:57:98:76:54) to a Client (STA) (e.g. MAC = 00:a0:57:12:34:56) is:
The addr1 field defines the destination/receiver, addr2 the source/transmitter and addr3 the BSSID of the frame. The Null frame is defined as type 2 and subtype 4. One of the most powerful possibilities of the scapy CLI is the direct call of wireshark to inspect a packet. This is as handy as:
>>> wireshark(packet)
A wireshark window should open and display the packet as shown in the following screenshot:
Creating a customized packet
Although there are a lot of predefined protocols/packets, we do need to create certain packets/protocols like e.g. information fields manually. This is where python comes into play and a more elaborate introduction can be found at [2].
We import scapy and create a class that is derived from scapy.Packet. Besides the class member name, the fields_desc is the most important variable. With the help of ByteField from scapy, we can create new information elements like ID and length of the included elements as well as the supported rates themselves by setting up a list of supported rates in hexadecimal notation and insert these values in ByteFields. Since each ByteField is unique, the names of the fields for supported rates need to differ, that’s why we enumerate the values and create them with supported_rate1, supported_rate2 and so on.
from scapy.all import *

class Dot11EltRates(Packet):
    """ Our own definition for the supported rates field """
    name = "802.11 Rates Information Element"
    # Our Test STA supports the rates 6, 9, 12, 18, 24, 36, 48 and 54 Mbps
    supported_rates = [0x0c, 0x12, 0x18, 0x24, 0x30, 0x48, 0x60, 0x6c]
    fields_desc = [ByteField("ID", 1), ByteField("len", len(supported_rates))]
    for index, rate in enumerate(supported_rates):
        fields_desc.append(ByteField("supported_rate{0}".format(index + 1),
                                     rate))
You can either enter the values of the defined fields as hexadecimal ones with “0x” in front or as integers like the value of the “ID” ByteField in the example above. It is important that the byte value of the “len” field matches length of the successive byte elements.
Sending a (customized) packet
If we want to send a packet via python/scapy, we first have to set up our monitoring interface, which will be our USB WLAN Stick. We can use the command “iwconfig” in a bash to find the all the installed WLAN interfaces, use “ifconfig” to identify the right one via MAC address if you got more than one WLAN interface. In my case the TP-Link WLAN USB Stick is named “wlp0s29u1u7”. For the following steps, you need to be root or use sudo to configure the stick to the required monitor mode.
1) Turn the interface down via “ifconfig wlp0s29u1u7 down”
2) Set the device to monitor mode via “iwconfig wlp0s29u1u7 mode monitor”
3) Turn the interface back on via “ifconfig wlp0s29u1u7 up”
4) Set the interface to a certain channel via “iwconfig wlp0s29u1u7 chan 6”
5) If the settings were correctly adapted, the output of “iwconfig wlp0s29u1u7” includes “Mode:Monitor” and “Frequency:2.437 GHz” (for channel 6 in this example).
We can now use this interface to send packets via scapy. The following python code builds an association request packet via the predefined Dot11, Dot11AssoReq and Dot11Elt packets and extends the packet with rate information that is defined in the class given above. Afterwards we use the “sendp()” command to send the packet on the defined monitoring interface.
The code has to be executed as root or via sudo due to the control over the network interface. The script will output a warning, that no route for IPv6 destination :: could be found (happens during import of scapy and can be ignored) afterwards a “.” and the message “Sent 1 packets” should be visible, which means that the created packet was sent.
WARNING: No route found for IPv6 destination :: (no default route?). This affects only IPv6
.
Sent 1 packets.
Due to the packet.show() command at the end of our code, scapy will also print the packet to the standard output:
###[ 802.11 ]###
subtype = 0
type = Management
proto = 0
FCfield =
ID = 0
addr1 = 00:a0:57:98:76:54
addr2 = 00:a0:57:12:34:56
addr3 = 00:a0:57:98:76:54
SC = 0
addr4 = 00:00:00:00:00:00
###[ 802.11 Association Request ]###
cap = ESS+privacy
listen_interval= 10
###[ 802.11 Information Element ]###
ID = SSID
len = None
info = 'MY_BSSID'
###[ 802.11 Rates Information Element ]###
ID = 1
len = 8
supported_rate1= 12
supported_rate2= 18
supported_rate3= 24
supported_rate4= 36
supported_rate5= 48
supported_rate6= 72
supported_rate7= 96
supported_rate8= 108
You might have noticed that scapy does not print the length of the 802.11 Information Element containing the SSID info. The length is calculated automatically while sending the packet and not while it is printed. See the following screenshot in the Conclusion for proof.
Conclusion
Within the examples given in this post, we are able to create packets based on predefined ones in scapy and are able modify or create certain elements via python. If you are able to sniff the packet on the air, we can take a look at it in wireshark:
Following up is the complete code.
from scapy.all import *
class Dot11EltRates(Packet):
""" Our own definition for the supported rates field """
name = "802.11 Rates Information Element"
# Our Test STA supports the rates 6, 9, 12, 18, 24, 36, 48 and 54 Mbps
supported_rates = [0x0c, 0x12, 0x18, 0x24, 0x30, 0x48, 0x60, 0x6c]
fields_desc = [ByteField("ID", 1), ByteField("len", len(supported_rates))]
for index, rate in enumerate(supported_rates):
fields_desc.append(ByteField("supported_rate{0}".format(index + 1),
rate))
packet = Dot11(
    addr1="00:a0:57:98:76:54",
    addr2="00:a0:57:12:34:56",
    addr3="00:a0:57:98:76:54") / Dot11AssoReq(
        cap=0x1100, listen_interval=0x00a) / Dot11Elt(
            ID=0, info="MY_BSSID")
packet /= Dot11EltRates()
sendp(packet, iface="wlp0s29u1u7")
packet.show()
Like last year’s post about WLAN in 2014, you can read it here, it is time to look back what happened in the wireless space this year and give a forecast for topics of 2016.
Looking Back
867 Mbps becoming the new basic speed for 5GHz APs
We currently see an increasing demand for 802.11ac APs with two spatial streams as some sort of the default AP. Up to this year the 300 Mbps 802.11n APs were the high running product for most and 450 Mbps 802.11n or 1300 Mbps 802.11ac APs for the top notch installations. Since only Apple (and to a certain degree Dell) released 11ac Clients with 3 spatial streams, the vast majority of smartphones, tablets and laptops includes 1 or 2 spatial stream adapters, so a 11ac AP Wave 1 with 2 spatial stream is a perfect fit for today’s demand for bandwidth and it’s always great to see more and more 5 GHz installations.
A new channel bandwidth: 160 MHz
With the release of 802.11ac Wave 2 Access Points, an increase in the maximum channel bandwidth from 80 to 160 MHz took place. This of course is an 5 GHz only feature since it requires 8 x 20 MHz channels. This feature looks great on paper, it can nearly double the throughput of an 80 MHz AP creating really flashy numbers, but it lacks benefit in the real world. Besides some installations, mainly in the consumer space in a rural area, most enterprise customers are better of with 8 individual 20 MHz channels or at least 4 individual 40 MHz channels than a single 160 MHz channel causing co-channel congestion on all the non-160 MHz APs and vice versa.
Another spatial stream: No. 4
With Wave 2 came the fourth spatial stream to the APs, since I haven’t been able to find any client with a 4 stream WLAN adapter, this increase in spatial streams is more or less a simple benefit for MU-MIMO. I will explain this in the next paragraph.
MU-MIMO in action
Marketing departments hoped for a new flashy feature in 802.11ac besides the increase in spatial streams, channel bandwidth and Modulation and Coding Schemes to tell customers about the exciting new possibilities with the newer 802.11 standard. Multi-User MIMO promised to deliver a new way of how the medium can be accessed and could enhance the total throughput for client devices with less spatial streams than the AP has. By transmitting to other clients on antennas that are unused for a single client with less spatial streams than the AP can offer, the total throughput of all the transmissions should be greater than the one for the single transmission alone. Unfortunately we saw the first enterprise APs with this feature (e.g. Ruckus) and missed the clients to support this. At Wireless Field Day 8, Ruckus showed their feature against prototype clients, you can watch this video here: Ruckus demos MU-MIMO
We have to consider that APs will always “loose” one antenna for proper beamforming. So MU-MIMO can only take off if an AP has three or four spatial streams, which leads to a new notation of Tx Antennas, Rx Antennas, MIMO Spatial Streams and MU-MIMO Streams like 3×3:3:2 or 4×4:4:3. As long as no one figures out, how to utilize all antennas for MU-MIMO, the two stream APs would be 2×2:2:1, which means that there can be no second (beamformed) transmission at the same time.
With the release of the Nexus 5X, the first MU-MIMO capable client came to market and we can hope that the other vendors than Google will follow with their smartphone refresh in 2016.
Location, Location, Location
All big enterprise WLAN companies are offering Location Based Service (LBS) engines and customers start to figure out what to do with it. The whole LBS game is relatively new but very promising for the industry because the LBS-customers do not only offer wi-fi to their customers to keep them happy, but also get something back that is very useful in our modern, digital world: data from customers. Especially the retailers out there want to dig deeper into their costumer behavior and LBS promises to delivers this, quite good at the moment but even better in the near future.
As Cisco sets the bar quite high with their “hyperlocation” promising down to 1m accuracy (for associated clients), see their demo here, the rest of the enterprise will soon step up to the game. While all the Cisco methods still rely on RSSI of broadcast or data packets, it will be interesting to see if another, more precise method can be established next year to increase accuracy not only for associated clients.
Forecast
60 GHz and 802.11ad
I’ve written about this in my last year’s post about WLAN in 2014 within the forecast and now there is the first official slide claiming 802.11ad is not dead! Qualcomm will offer official support for the new IEEE standard in the 60 GHz band with their upcoming SoC – the Snapdragon 820. The slide is taken from the article at Anandtech about that SoC, you can find it here. We still have to wait and see how the AP side will react to this (first announcement in the customer space can be found here). I guess we will all have to wait and see how the enterprise vendors will adapt and promote this new standard this year.
Please note: Since 60 GHz is suitable for Line of Sight (LoS) connections within short range, we might see some adaption in conference rooms/centers in the enterprise space, while the main installation will remain on 2.4/5 GHz.
Conclusion
Most of the topics from 2015 have to do with 802.11ac, which is becoming the new standard while Wave 2 added some new features or enhancements to it that still need to be used by clients in the near future.
What is your opinion on the given topics? Which hot topics of 2015 do you think I missed? Comments are welcome.
Though some WLAN experts claim that 2.4 GHz is dead and we all should move to 5 GHz, customers still rely on 2.4 GHz due to legacy clients or even new clients with 11bgn only wi-fi adapters. Some of these customers might tell you that they want to use 40 MHz channels in 2.4 GHz because they think they can achieve a very high performance and that would be essential for their typical workloads. As some might scream “If you want high performance, go to 5 GHz and be happy”, a statement that I do support very much, a customer can still point a finger at you and tell you that your Access Points (APs) might support 40 MHz in 2.4 GHz so it is his right to use it.
First of all, the use of 40 MHz channel bandwidth requires an RF-environment with no 11b/g-only BSSIDs, otherwise the AP is forced to use 20 MHz. Although it might be possible to use 40 MHz at the initial start of an BSS, the AP has to monitor the environment to fall back to 20 MHz as soon as he discovers an BSS with 11b/g only. This method is required by the IEEE 802.11 standard. A client has the possibility to inform the AP that he has to switch to 20 MHz via an Action Frame.
If you live in a rural area, you only use a single AP and the next 2.4 GHz AP is miles/kilometers away, we all can agree that 40 MHz might be an option. But what about an enterprise setup with multiple APs, SSIDs and neighbors? You got channel 12 and 13 in Europe so you could do a two channel model with grouping of the 40 MHz channel pairs 1,5 and 9,13, so the 40 MHz channels don’t overlap. This might be a good setup in theory, so what can go wrong? Well, here are two things that we experienced:
1) Client Behavior
A client might not like a switch from 40 MHz to 20 MHz during an established connection. We saw this with an Intel Dual Band Wireless-AC 7260 adapter running driver version 17.13.12.1 (2014-12-16). Traffic is send from AP to client and suddenly the client notifies the AP of an intolerant BSS, so that the AP has to disable 40 MHz channel bandwidth (see pictures below).
I’ve added the column “40 MHz support” to my Wireshark columns, so that you can see directly that the Beacon before the Action frame had 20 and 40 MHz support, the one after the action frame only 20 MHz support. Following the switch in the Beacon, the client sends a Deauthentication to the AP and the Probe Request/Response Ping-Pong begins.
At the end, since the AP sends a Disassociate to the Client (frame 67) the client has to go through Authentication and Association again (followed by the Block ACK negotiation).
As shown above, the Intel client looses the connection to the AP when 40 MHz operation is stopped. Though you might claim that this happens due to a single AP setup, we have a costumer complaining about disconnections with Intel clients in his site with multiple APs installed.
2) Performance
We configured a traffic source to send 15 Mbps of throughput via Ethernet to the AP, which sends them via WLAN to the Intel client. We used 1400 Byte packets to achieve this load and chose a time interval of 10.0 seconds for the following graphs, so each bar in the graphs represents 10.0 seconds. The equivalent WLAN throughput over 10 seconds would be 150 Mbps.
Please note that the sniffer used in this test did not capture all the packets, we have sent 1 million test packets (excluding retries) and about 84% of these test packets have been captured. There have been other APs on the used channels, causing additional traffic that did not belong to the test transmission and this additional traffic is split into “Beacons” and “Other” in the following graphs. Let’s take a look at the throughput over time:
Throughput over Time
As long as the 40 MHz channel bandwidth was used, we can see that the total “Downlink (DL) to Client” throughput, including initial and retry transmissions, varies a lot around 150 Mbps/10.0 seconds, including a certain amount of retransmissions. We don’t meet the 150 Mbps for each of the 10 seconds steps, sometimes it is a bit lower, sometimes much higher. After the switch to 20 MHz channel bandwidth and the client reconnecting to the AP, we see a rather constant 150 Mbps/10.0 seconds of total DL throughput with only a small amount of retransmissions.
Medium Allocation over Time
We also plot the air times of the given categories as percentages of the time interval and call it “Medium Allocation”. As the time interval is defined as 10.0 seconds, 10 seconds are 100%. The air time is defined by “packet length in bits” divided by “data rate in bits”. The “Unused time” in this case is defined as: “10.0 seconds” – “Total DL time” – “Total UL time” – “Total Other time”. With the constant 15 Mbps throughput, the medium was not saturated. We can also see that the “Other Beacons” take a certain amount of time due to a rather low basic data rate.
The air time of the total DL transmissions for 40 MHz is a little lower than for 20 MHz, for most of the 10 seconds time steps. It varies between 5.8 and 14.4 % (Average: 8.2%, Median: 7.7%). Due to the higher data rate, this was expected, but the 20 MHz total DL transmission are nearly constantly using 12.1 to 12.3 % of air time (Average: 12.2%, Median: 12.3%), which means that the total 20 MHz DL transmission time is not twice as much as the total 40 MHz DL transmissions time. So yes you can lower the medium allocation/DL air time by using 40 MHz channels, but you loose efficiency due to more retransmissions.
Summary
A 40 MHz channel model in 2.4 GHz in an enterprise environment does not show the benefits that you might expect. We saw that Intel clients do not honor the switch from 40 MHz to 20 MHz channel bandwidth and require a reconnection. Furthermore, the throughput of 15 Mbps was rather constant with 20 MHz since less retransmissions occurred and so the air time of the total DL transmission is not twice as much as for the 40 MHz bandwidth.
If we take into consideration that the customer could use a four channel model with 20 MHz instead of a two channel model with 40 MHz, the total throughput of four parallel 20 MHz transmissions might give him way more efficiency over all four channels than two parallel 40 MHz transmissions. We can assume this by expecting more retransmissions for intended loads that saturate the medium (much) more than the 15 Mbps in this example and more “Other” traffic than in this example from neighboring companies using the same channels. The question is, if it is possible at all to achieve a higher load than the total net throughput of the 144.4 Mbps data rate (highest 20 MHz data rate with short Guard Interval)?!
Have made a similar experience? Have you found a client that dealt with the 40->20 MHz channel bandwidth switch without any troubles? Do you got any customers demanding 40 MHz in 2.4 GHz? Please share your opinion on this topic in the comments section.
As I have explained in my previous blog post about the “Störerhaftung” for guest access to WLAN hotspots, offering free Wi-Fi in Germany does not come without any risks. The latest draft law tries to remove the accountability of wi-fi hotspot operators in case a wi-fi user breaches the law.
If the law passes the german parliament, the “Bundestag”, an operator has to use encryption or let the users voluntarily register for the service. It is also necessary to force each user to accept the General Terms and Conditions including a term like “I won’t use this wi-fi hotspot for any illegal activity”.
The combination of encryption and GTC acceptance is criticized since it would require individual access codes for each user, a requirement that is hard to meet with most commercial wi-fi equipment. Let’s wait and see if the law will pass unchanged and if it can improve the hotspot situation in Germany.
In October 2014, Keith Parsons brought the Wireless LAN Professionals Conference (WLPC) to Maastricht in the Netherlands. It was a great event for all the attendees to get to know other WLAN folks and talk about our common passion – improving the Wi-Fi experience by sharing our knowledge. There will be another WLPC_EU this October, so if you are interested, I highly recommend it.
One of the presentation slots was given to my presentation about WLAN and security. You can watch a recording of that presentation at Vimeo or right below.
Tagline: “Everybody can do 802.11i, but what other security concepts can or should play a role in designing a secure network, not only in regards to WLAN? This session is about protected management frames and the german/LANCOM view on secure (wireless) network infrastructure.”
You can check out a lot of other WLPC_EU presentations via this link and read more about Protected Management Frames in my blog post.